|
How to Flash your phone's firmware.
I know there are already some good guides on flashing your phone with the
different firmwares, but each walks you thought as part of some "Bigger
process"... so its more geared towards that process, lists all the pre-reqs for
that process, etc..
This is the straight GENERIC process to flash
your phone with ANY firmware.... It is based upon -> Flashing a Verizon V3c to Alltel which was part of a guide to flash to the Alltel firmware, as such, contained
extra pre-reqs and the other steps to make the Alltel V3C firmware work on
Verizon phones.
WARNING:
Flashing with firmware not intended for your particular phone could render it
useless or inoperable and it may NOT be possible to recover. Please be
sure to only use flash files meant for your phone/carrier, or that you know will
work on your phone.
WARNING:
Flashing with firmware from a different wireless carrier (example: Flashing a
Verizon phone with Alltel firmware, and wanting to still use it on Verizon's
network) may either BRICK YOUR PHONE, OR just require additional work to get all features (i.e. data services, WAP,
MMS Messaging, Get-It-Now) working again. Please be aware of what is
involved BEFORE you flash with another carrier's firmware!!
WARNING: If
you flash your phone with firmware from a different carrier, your current
wireless carrier will NO LONGER support you, and will most likely void any warranty on
your phone.
WARNING: In most cases, flashing will erase all
personal data, contacts, pictures, ring tones, games, applications, etc.
stored in the phone's memory. Please be sure to back up this information
PRIOR to flashing. (NOTE: Due to Get-It-Now and BREW, it may not be
possible to backup games/applications installed on your phone.)
NOTE: there are Upgrade Flash files and
Monster Flash files available. Monster Flash files will completely
erase and re-write your phone's firmware and file system, removing all traces of
the previously installed firmware. It will revert your phone to a "fresh
out of the box" state. Use an Alltel Monster Flash on a Verizon phone, and
you've turned your phone into the same thing as a phone "Fresh out of the box"
from Alltel. UPGRADE Flash Files leave the current
file system in place, and put the upgraded files onto the phone. In many
cases this results in "hybrid" firmwares, or "left over files" still on the
phone. Upgrade Flash files will not revert you to a "fresh out of the box"
state. So if you are trying to recover from a catastrophic failure, you'll
want to use a Monster Flash File if one is available.
Required... if you were
refered to this page by another process, you may already have these pre-req's in
place.
1. USB Cable (see the FAQ)
2. Install the Motorola USB Modem drivers.
3. Install and configure Motorola PST (v7.23 or higher) and its drivers, along with testing its
connection (Formerly known as the Prep-work section of the Seem Edit page).
4. Firmware flash file.. (obtain from http://www.humpa.com/vzw or http://ryfiles.com/flash or Phone Encyclopedia link at phonenews.com)
NOTE: the PST version depends on what model phone you have, and if you are going to be just flashing, or using PST to backup various features/settings of the phone. If you are following one of the "Monster Guides" to use the Alltel or Vivo firmware on your Verizon phone, you need to use PST v7.25 so that all the required backup processes work properly.
NOTE: its possible to flash the phone with RSDLite also, however, that is a slightly different program, as such would use a different process. See Flashing using RSDLite for more info.
The Process...
Note: If using the Verizon Impulse V3Cpp, you might need to Load SEEM 0055 into P2KSeem to retrieve SPC code for your phone and set
back to 000000.
NOTE: if trying to recover a phone by reflashing, you may need to put your phone
into Boot Loader mode... this is usually accomplished by pressing/holding
* and # keys while using the power button to turn the phone "on".
NOTE: When tryinng to recover a V3C/V3M/V9M/K1M or other phone that uses a USB Mini-B or MicroUSB cable, to get into Boot Loader Mode... you may need to unplug the phone, remove the battery, insert the battery, hold the * and # keys while connecting the USB cable.
Get Started...
Install the software and drivers as listed in the
requirements section above. Download/unpack the firmware file you wish to
use on your PC.
Unplug your phone from the PC, power it off, then back on, and re-connect it to
the PC.
FLASH THE PHONE's FIRMWARE...
Please be sure your battery is fully charged! You do not want to run the
risk of the battery dying mid flash!
Remove any MicroSD or Transflash cards from the phone. Failure to do so on some firmwares (like Vivo) may result in the phone being in USB Mass Storage Device mode after flash, and programs like MPT, PST, MFF, etc will not be able to connect to the phone.
Use PST's MultiFlashFlex (MFF) application to flash the phone (note:
the PST install process usually does not create an icon for MultiFlashFlex on
the start menu. So if there is not an icon on your start menu, launch via
c:\Program Files\Motorola\PST\MultiFlashFlex.exe )
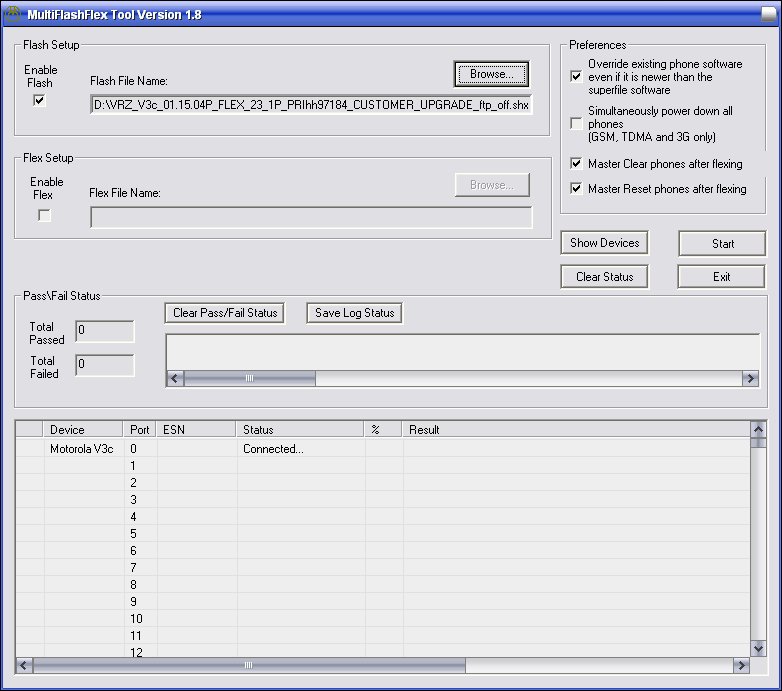
In the Flash Setup area of the MultiFlashFlex program window,
check the box for Enable Flash, and use the Browse button to locate and select
the .SHX file for the firmware file you have downloaded.
In the Flex Setup area of the MultiFlashFlex program window,
make sure the box for Enable Flex is UNCHECKED.
In the Preferences area of the MultiFlashFlex program, check the
boxes for Override even if newer, Master clear and Master Reset.
Example Screen Shot -> MFF1.jpg
Click the Start button.
NOTE: you might see an "invalid ESN" message as MFF switches
the phone into FLASH mode. This is normal.
NOTE: The first time you flash your phone, the Add New
Hardware Wizard may run and try to install the drivers for the FLASH INTERFACE.
If it does not find the driver automatically, point it to the drivers you
downloaded/unziped before (the DriverPack) as part of the installing PST
pre-req.
When the flashing process is complete, the Status column in
the lower portion of the MultiFlashFlex program window should show Successful, and the phone should
restart itself. Once the phone has restarted itself, MFF will report
CONNECTED in the Status Column. It is now safe to disconnect the phone.
You may now exit MFF.
Unplug your phone from the PC. If the phone is in the powered
off state, power it back on.
Perform a Master Reset, and Master Clear. On the
phone... Menu -> Settings -> Initial Setup. Highlight
Master Reset, and press the soft menu key to Select. When prompted for
Security Code, enter 000000 or your phone's SPC. Press the soft menu key for OK. When
prompted to "reset all phone settings?" press the soft menu key for YES.
The phone will restart itself. Repeat the same steps selecting Master Clear.
You are now complete.
Your phone is now successfully flashed. You are
ready to proceed to activating your phone, or any required work to make the
phone functional on your wireless carrier's network.
|
